Feeds:
Posts
Comments

The TeePee :)

The TeePee 🙂 , originally uploaded by SewLaTea.

I’ve been wanting to make one of these for so long. Now that the playroom is finished (which reminds me, that I still haven’t blogged about the redo!) I had no excuse. Well except maybe a newborn at home, but that’s beside the point 😉 I used a great tutorial to make this, and I could never have done it without! Thank you to Rachel of Smile and Wave for taking the time to write it all down! My teepee did not come out as neat as hers, and I definitely made a couple mistakes. I cut down my poles a foot shorter than hers and then tried to recalculate measurements and angles….math was never my strong suit…so this proved to be challenging. I did my best and though the panels don’t line up as nicely as Rachel’s up on top, it still works! And the kids think its cool 🙂 I think I’ll paint it like Rachel did too…clean and simple 🙂

{made for Meg}

new curtains for Meg’s girls’ room, originally uploaded by SewLaTea.

About a year and a half ago I made that quilt on the bed for Meg’s baby girl. (Also shown here and here) It was soon after that we started talking about eventual curtains to finish the room. Meg asked if I would be interested in making them for her. Of course I said “yes!” After much back and forth picking out fabrics and a design, we came up with a plan and I got to work. I made six lined panels, using 3 different fabrics from Tanya Whelan’s Dolce line.  Meg ordered them from Lola Pink Fabrics and per Meg they were super accomodating and the fabric was delivered super quickly!  Meg wanted grommets, which I have never attempted but have been wanting to try. They were actually quite easy. The curtains themselves weren’t very difficult, though very time consuming. Most of my time was spent measuring, cutting and ironing. The sewing part was the easiest part. I also made these with a big ole’ 27 week baby bump which also made it challenging….lots of bending, kneeling, measuring, pinning and cutting……all on the ground. I used Orange Sugar’s awesome tutorial, which was very easy to follow.  I love the way they came out and am thinking I might do the same for my own baby girl to be!   So here they are! It’s so nice to see them hanging against her beautiful pink walls 🙂

Baby Girl Quilt Inspiration


Baby Girl Quilt Inspiration, originally uploaded by SewLaTea.

Here are just SOME of the MANY quilts inspiring me these days…

Getting ready for baby girl…


Baby Girl Nursery Inspiration, originally uploaded by SewLaTea.

26+ weeks now and nesting quite a bit these days…lots of dreaming…browsing…getting inspired. These 25 photos are the latest nurseries and details that are inspiring me to create a beautiful nursery for my baby to be. I’ve got my fabrics set aside waiting to be cut into for a quilt and curtains. They are mostly European fabrics that are very colorful…thinks deep pinks, reds and aqua. I’ve got to decide what style quilt I’m going to make…thinking some pattern using half-square triangles. My next (BIG) decision will be paint color. This one always stumps me. Since the details in the room will have so much color, I’m thinking subtle for the walls…pale pink? pale aqua? Really not sure which way to go. In the meantime, I’ll continue browsing flickr and gathering ideas 🙂

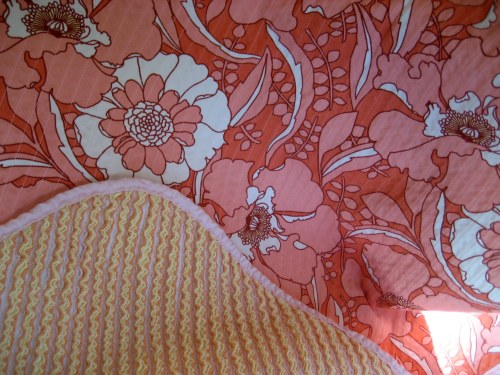
This project was so much fun!!! It was my first nesting project of many for baby girl to be 🙂 After having 2 boys, this was such an exciting project for me….girly fabric and girly colors! I used Anneliese’s wonderful tutorial over at Aesthetic Nest. She used the same fabric on front, and like I said in previous posts, I just had to use the same it is SO beautiful!! I’m thinking she should sell it as a kit! I passed the tutorial on to another friend, who just made one with adorable John Deere fabric for her newborn son. She too loved this and will also be making more 🙂

The only thing I did differently was that I made my own binding. I used a pale pink solid, which almost takes on a peachy feel next to the tangerine. I love pink and tangerine together so it was a good match.

The chenille was surprisingly easy to make! I used Olfa’s Chenille Cutter which made the process quick and easy. My friend started hers using scissors and it didn’t take her long to go to the store and buy the chenille cutter which she said was MUCH easier.

I only made one big goof while making the chenille which was cutting through ALL the fabric (eeek!) I only got about 1 1/2 inches in before realizing so I just took off that much on each side while squaring up.

I love the rounded corners (something I’ve been wanting to do for a long time!). Gives the blanket such a warm, cozy and professional look.

I had wanted to hand bind the binding on as I do with quilts, but once I got the front sewed down, I realized hand binding onto that chenille might not be the best idea. I then just pinned the binding all around and top stitched the entire thing. A little less “neat” than I was going for, but I think will last longer and made more sense.

Thank you Anneliese for this amazing tutorial! I loved every minute of making my first baby girl blanket 🙂

*WIP* Heirloom Cut Chenille Blanket, originally uploaded by SewLaTea.

Just a peek at what I’ve been working on the past few days. I used Aesthetic Nest’s AWESOME tutorial. Now had a been a good student, I would have remembered that she said to sew only ONE line flannel side up…and then to flip over and stitch with the fabric side up…I learned 8 lines later….and a bobbin tension issue clear as day 😦 I decided to keep sewing. and sewing. and sewing. I considered taking out those stitches that looked goofy, but after seeing it all sewn, I barely noticed those lines…oh…or  the wonky lines 😉 Good thing this yummy blanket is for myself and not being gifted! I love this tutorial. I love the way it came out. (Blanket is getting all snuggly now in the wash). More pics to come. BTW–YES I did copy Anneliese’s fabric too (I hope she won’t mind!). I fell in LOVE with the entire package, and couldn’t see past this yummy Amy Butler print (August Fields, Dream Poppies in Tangerine)…I just had to use it too. (Copying is a form of flattery, right!?).

More on finishing up the blanket tomorrow 🙂

Hemming Jeans–the cheater’s way, originally uploaded by SewLaTea.

I’ve been hemming my jeans this way for years!  I don’t remember where I got the instructions, but what I LOVE about it, is that it keeps the original hem intact….and who wants a fake hem….there’s a reason you like the jeans, so let’s keep it that way!  I hope these instructions aren’t too confusing…let me know if they are and I’ll correct it. 

Step 1: Put on the pair of jeans you want to hem and fold up the bottoms to the right length (I usually err on the side of caution and allow room for shrinkage over time, so usually make them a little bit longer than I really need). Pin in a couple places.

Step 2: Take off the jeans. Measure the distance between the bottom of the original hem and the bottom of the fold. Now take the number and divide in half. In my case I had a measurement of 2 1/2…so half of that was 1 1/4. The next part  is to then pull down the hem until it (bottom of the original hem to bottom of fold) measures the latter number (ex. 1 1/4). Pin all around the bottom of the leg, measuring as you go.

Step 3: You are then going to stitch JUST outside/below the original hem, all the way around. Depending on the jean thickness you may need a bigger needle. Also make sure the side seams are laying flat, as they can be very thick and difficult to sew over. I have a little tool that lifts the presser foot and helps get over that “bump”. Not sure what it’s called.

Step 4: fold under the “excess” fabric so that you are left with the original hem, just shorter!

Step 5: Press well

Step 6: Try on and make sure you’ve got the correct length. If ok, then I will usually cut away the excess fabric, and just use a reinforcing stitch so that it doesn’t fray too much.  (if there is a lot of excess material and you don’t trim it, it may unfold when you wear it…)

Step 7: Wear and be comfortable 🙂

Friday I’m in love…

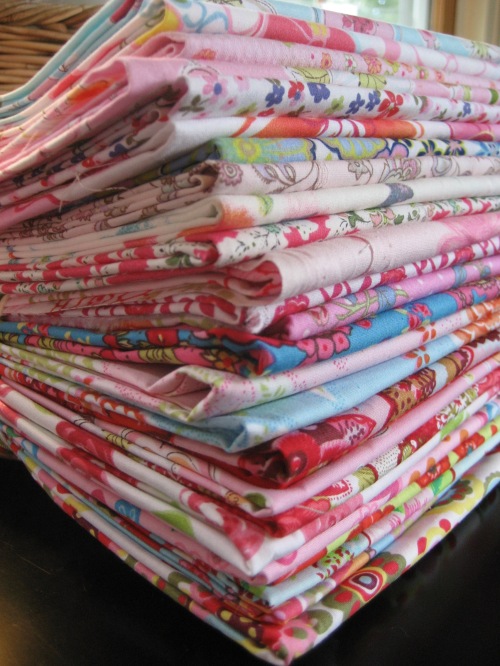
…with these AMAZING European fabrics!! I bought them with baby girl in mind…hoping to make an amazing quilt for her. I bought these fabrics from two places…BanberryPlace.com and Sheree’s Alchemy. Corie of Banberry Place also has a blog called Stunt Sewing. Sheree of Shereesalcemy has an online store, an etsy shop, and a blog.   Both shipped quickly and were packaged perfectly! I’m so excited to get started!!

Wonky Star Baby Quilt

Wonky Star baby quilt, originally uploaded by SewLaTea.

God I LOVE finishing up a quilt…nothing better than a yummy, crinkly, fresh smelling quilt to snuggle with. This one is going to a baby boy to be. I made it 60″x60″….a lot bigger than a traditional crib quilt, but I love the idea of a baby quilt growing with the child. Plus, it makes a great mat for the baby to play and rest on. I made each block 20″x20″ and used a variety of greens and aqua blues…crisp and clean.

Up next: some curtains for my god-daughter using Tanya Whelan’s Dolce line and a lot of baby girl stuff for my own baby girl to be!

I have two happy bundles coming my way filled with beautiful European fabrics that I plan to use for my baby girl’s quilt…and whatever else I decide to use it for.

I also have some Amy Butler, August Fields, Dream Poppies in Tangerine here to make this beautiful baby blanket (and yes, I did choose the SAME fabric…its just so beautiful!!)

Lots to keep me busy in the next few months before baby girl arrives! Off to fold some laundry now, bleh.

Quilt top is done…

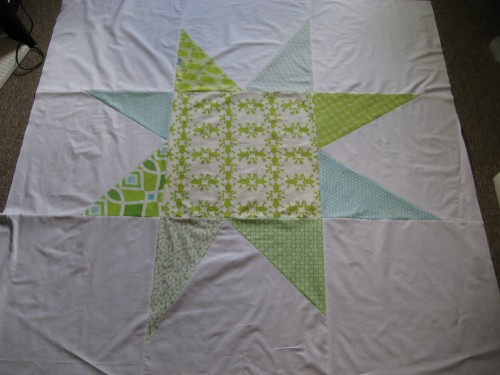
quilt top–WIP, originally uploaded by SewLaTea.

A peek at what I’ve been working on…a new quilt for a new baby to be. He’ll be here in less than two weeks so I better get moving and finish up this baby. It’s actually a 60″x60″ star! I made one ginormous wonky star instead of several smaller ones.

Trying to figure out how to piece the quilt back now. Maybe thinking 5 small wonky star blocks across the quilt with white everywhere else….or I was also thinking baby blue flannel for a softer feel…better decide soon.

Also thinking about how I’m going to quilt it. I’m tossing around some different ideas.

I am loving the colors/patterns…it’s so soothing and crisp. I can’t wait to finish it and see it in all its quilted, wrinkly, yumminess 🙂